1.作品名稱:撈漁撈不完
2.影片:
3.程式碼:
(1)arduino:
int buttonPin2 = 4;
int buttonPin3 = 3;
int buttonState2 = 0;
int buttonState3 = 0;
void setup() {
pinMode(buttonPin2, INPUT);
pinMode(buttonPin3, INPUT);
Serial.begin(9600);
}
void loop() {
buttonState2 = digitalRead(buttonPin2);
buttonState3 = digitalRead(buttonPin3);
if (buttonState2 == HIGH) {
Serial.print('A');
}
else if (buttonState3== HIGH) {
Serial.print('S');
}
else {
Serial.print('H');
}
delay(500);
}
(2)processing:
import processing.serial.*;
Serial myPort;
PImage fish, fisher,background;
float []fishX=new float[10];
float []fishY=new float[10];
int []fishLive =new int[10];
float []fishSpeed = new float[10];
int key;
int x,y=300,level=0;
void setup(){
size(900,600);
myPort = new Serial(this, "COM6", 9600);
fish=loadImage("fish.png");
fisher=loadImage("fisher.png");
background=loadImage("ocean.jpg");
for(int i=0;i<5;i++){
fishX[i]=i*-200;
fishY[i]=300+random(200);
fishLive[i]=1;
fishSpeed[i]=random(2) + 2;
}
}
int a=0,live=100,end=0;
int shift=4;
void draw(){
if(myPort.available()>0){
key = myPort.read();
println(key);
}
if(end==1){
background(255,0,255);
shift=0;a=100;}
background(225);
image(background, 0, 0);
if(a>0){
a--;
background(255,0,0);
live--;
if(live<0) live=0; }
if(live<=0) end=1;
textSize(80);
text("Life: "+live,100,100);
for(int i=0;i<5;i++){
if(fishX[i]+100>400 && fishX[i]<400+100 && fishY[i]+100>y && fishY[i]<y+100)
{fishLive[i]=0; }
if(fishLive[i]==1) image(fish,fishX[i],fishY[i]);
fishX[i]+=fishSpeed[i];;
if(fishX[i]>900){
fishX[i]-=1000;
fishY[i]=300+random(200);
if(fishLive[i]==1){ a=10; }
fishLive[i]=1;
} }
if(key=='A')
{y+=5;}
else if(key=='S')
{ y-=5;}
else if(key=='H')
{y+=0; }
image(fisher, 400,y,100,100);
if(end==1){
text("sorry,fisher is broken ", 60,300);
}
}
4.心得:
這次的作業從一開始不懂到問了同學,也請教很多學長姊,得到很多人的幫助之後理解,但是也花了我們很多的時間,因為基礎沒有很好,但是我們也盡力去理解程式碼,雖然說可能很多都是老師上課講解過或者是同學教過的東西,但是我們不懂也有去問他們,最後雖然沒有很精緻,但是也努力去完成它了,上完老師的課,讓我收穫十足,但要是回家沒複習,下次要在連接上就會困難重重,這是我們這組要改進的部分,期待下次能再做得更好,讓大家更欣賞我們的作品
5.組員分工狀況 :
寫部落格:賴冠戎,程柔淇
撰寫processing遊戲主要程式:賴冠戎
將processing遊戲作修改:程柔淇
撰寫arduion程式:程柔淇
找素材:賴冠戎,程柔淇
電路板之連結:賴冠戎,程柔淇
拍攝影片:賴冠戎
2013年1月19日 星期六

Week14,hw12
1.這周進度:
(1).討論出主題
(2).更改processing(細修,方便接上Arduino)
(3).將Arduino程式碼完成
(4).電路板都接上並也能執行
2.心得
processing需要配合Arduino,所以要更改的地方很多,目前進度在processing,還有很多不了解的地方,但是有在問會的人,會盡力搞懂並且用好程式碼,等搞懂後arduino就可以很快地打出來了,電路也可以快速地接好,雖然說很多地方不懂,但是會積極去問別人並且理解程式碼的意思.因次把之前做的processing都修了一遍,組內討論時間允許的話,要在期末發表前把電路版加上更多花樣,例如將寶麗容求切一半貼於按鍵上,或是製作一個盒子,如此能更吸引大家遊戲,也能更高分,希望大家會喜歡
3.Arduino程式碼
int buttonPin2 = 4;
int buttonPin3 = 3;
int buttonState2 = 0;
int buttonState3 = 0;
void setup() {
pinMode(buttonPin2, INPUT);
pinMode(buttonPin3, INPUT);
Serial.begin(9600);
}
void loop() {
buttonState2 = digitalRead(buttonPin2);
buttonState3 = digitalRead(buttonPin3);
if (buttonState2 == HIGH) {
Serial.print('A');
}
else if (buttonState3== HIGH) {
Serial.print('S');
}
else {
Serial.print('H');
}
delay(500);
}
(1).討論出主題
(2).更改processing(細修,方便接上Arduino)
(3).將Arduino程式碼完成
(4).電路板都接上並也能執行
2.心得
processing需要配合Arduino,所以要更改的地方很多,目前進度在processing,還有很多不了解的地方,但是有在問會的人,會盡力搞懂並且用好程式碼,等搞懂後arduino就可以很快地打出來了,電路也可以快速地接好,雖然說很多地方不懂,但是會積極去問別人並且理解程式碼的意思.因次把之前做的processing都修了一遍,組內討論時間允許的話,要在期末發表前把電路版加上更多花樣,例如將寶麗容求切一半貼於按鍵上,或是製作一個盒子,如此能更吸引大家遊戲,也能更高分,希望大家會喜歡
3.Arduino程式碼
int buttonPin2 = 4;
int buttonPin3 = 3;
int buttonState2 = 0;
int buttonState3 = 0;
void setup() {
pinMode(buttonPin2, INPUT);
pinMode(buttonPin3, INPUT);
Serial.begin(9600);
}
void loop() {
buttonState2 = digitalRead(buttonPin2);
buttonState3 = digitalRead(buttonPin3);
if (buttonState2 == HIGH) {
Serial.print('A');
}
else if (buttonState3== HIGH) {
Serial.print('S');
}
else {
Serial.print('H');
}
delay(500);
}
2012年12月4日 星期二
week13,HW11
1. 程式碼
int speakerPin = 9;
int length = 15; // the number of notes
char notes[] = "ccggaagffeeddc "; // a space represents a rest
int beats[] = { 1, 1, 1, 1, 1, 1, 2, 1, 1, 1, 1, 1, 1, 2, 4 };
int tempo = 300;
void playTone(int tone, int duration) {
for (long i = 0; i < duration * 1000L; i += tone * 2) {
digitalWrite(speakerPin, HIGH);
delayMicroseconds(tone);
digitalWrite(speakerPin, LOW);
delayMicroseconds(tone);
}
}
void playNote(char note, int duration) {
char names[] = { 'c', 'd', 'e', 'f', 'g', 'a', 'b', 'C' };
int tones[] = { 1915, 1700, 1519, 1432, 1275, 1136, 1014, 956 };
// play the tone corresponding to the note name
for (int i = 0; i < 8; i++) {
if (names[i] == note) {
playTone(tones[i], duration);
}
}
}
void setup() {
pinMode(speakerPin, OUTPUT);
}
void loop() {
for (int i = 0; i < length; i++) {
if (notes[i] == ' ') {
delay(beats[i] * tempo); // rest
} else {
playNote(notes[i], beats[i] * tempo);
}
// pause between notes
delay(tempo / 2);
}
}
int speakerPin = 9;
int length = 15; // the number of notes
char notes[] = "ccggaagffeeddc "; // a space represents a rest
int beats[] = { 1, 1, 1, 1, 1, 1, 2, 1, 1, 1, 1, 1, 1, 2, 4 };
int tempo = 300;
void playTone(int tone, int duration) {
for (long i = 0; i < duration * 1000L; i += tone * 2) {
digitalWrite(speakerPin, HIGH);
delayMicroseconds(tone);
digitalWrite(speakerPin, LOW);
delayMicroseconds(tone);
}
}
void playNote(char note, int duration) {
char names[] = { 'c', 'd', 'e', 'f', 'g', 'a', 'b', 'C' };
int tones[] = { 1915, 1700, 1519, 1432, 1275, 1136, 1014, 956 };
// play the tone corresponding to the note name
for (int i = 0; i < 8; i++) {
if (names[i] == note) {
playTone(tones[i], duration);
}
}
}
void setup() {
pinMode(speakerPin, OUTPUT);
}
void loop() {
for (int i = 0; i < length; i++) {
if (notes[i] == ' ') {
delay(beats[i] * tempo); // rest
} else {
playNote(notes[i], beats[i] * tempo);
}
// pause between notes
delay(tempo / 2);
}
}
2012年11月27日 星期二
Week 12 , HW10
1. Ardunio 影片
2.Ardunio 程式碼
/*
Analog Input
Demonstrates analog input by reading an analog sensor on analog pin 0 and
turning on and off a light emitting diode(LED) connected to digital pin 13.
The amount of time the LED will be on and off depends on
the value obtained by analogRead().
The circuit:
* Potentiometer attached to analog input 0
* center pin of the potentiometer to the analog pin
* one side pin (either one) to ground
* the other side pin to +5V
* LED anode (long leg) attached to digital output 13
* LED cathode (short leg) attached to ground
* Note: because most Arduinos have a built-in LED attached
to pin 13 on the board, the LED is optional.
Created by David Cuartielles
modified 30 Aug 2011
By Tom Igoe
This example code is in the public domain.
http://arduino.cc/en/Tutorial/AnalogInput
*/
int sensorPin = A0; // select the input pin for the potentiometer
int ledPin = 13; // select the pin for the LED
int sensorValue = 0; // variable to store the value coming from the sensor
void setup() {
// declare the ledPin as an OUTPUT:
Serial.begin(9600);
pinMode(13, OUTPUT);
pinMode(12, OUTPUT);
pinMode(11, OUTPUT);
pinMode(10, OUTPUT);
pinMode(9, OUTPUT);
pinMode(8, OUTPUT);
pinMode(7, OUTPUT);
}
void loop() {
// read the value from the sensor:
sensorValue = analogRead(sensorPin);
Serial.println(sensorValue);
// turn the ledPin on
digitalWrite(13, HIGH);
digitalWrite(12, HIGH);
digitalWrite(11, HIGH);
digitalWrite(10, HIGH);
digitalWrite(9, HIGH);
digitalWrite(8, HIGH);
digitalWrite(7, HIGH);
delay(sensorValue);
digitalWrite(13, LOW);
digitalWrite(12, LOW);
digitalWrite(11, LOW);
digitalWrite(10, LOW);
digitalWrite(9, LOW);
digitalWrite(8, LOW);
digitalWrite(7, LOW);
delay(sensorValue);
// stop the program for <sensorValue> milliseconds:
// delay(sensorValue);
// turn the ledPin off:
// digitalWrite(ledPin, LOW);
// stop the program for for <sensorValue> milliseconds:
// delay(sensorValue);
}
心得:
當時在試驗旋鈕調LED燈的閃爍速度時,一開始都旋轉快,一下子就扭到底發現他就會故障,試了幾次都會這樣,當時還一直搞不懂! 後來詢問同學才知道,原來旋鈕轉到極限,會使整個線路"爆掉",所以在旋轉時只要旋轉小小的角度就可以達到我們影片中,路出來的效果囉!!
2.Ardunio 程式碼
/*
Analog Input
Demonstrates analog input by reading an analog sensor on analog pin 0 and
turning on and off a light emitting diode(LED) connected to digital pin 13.
The amount of time the LED will be on and off depends on
the value obtained by analogRead().
The circuit:
* Potentiometer attached to analog input 0
* center pin of the potentiometer to the analog pin
* one side pin (either one) to ground
* the other side pin to +5V
* LED anode (long leg) attached to digital output 13
* LED cathode (short leg) attached to ground
* Note: because most Arduinos have a built-in LED attached
to pin 13 on the board, the LED is optional.
Created by David Cuartielles
modified 30 Aug 2011
By Tom Igoe
This example code is in the public domain.
http://arduino.cc/en/Tutorial/AnalogInput
*/
int sensorPin = A0; // select the input pin for the potentiometer
int ledPin = 13; // select the pin for the LED
int sensorValue = 0; // variable to store the value coming from the sensor
void setup() {
// declare the ledPin as an OUTPUT:
Serial.begin(9600);
pinMode(13, OUTPUT);
pinMode(12, OUTPUT);
pinMode(11, OUTPUT);
pinMode(10, OUTPUT);
pinMode(9, OUTPUT);
pinMode(8, OUTPUT);
pinMode(7, OUTPUT);
}
void loop() {
// read the value from the sensor:
sensorValue = analogRead(sensorPin);
Serial.println(sensorValue);
// turn the ledPin on
digitalWrite(13, HIGH);
digitalWrite(12, HIGH);
digitalWrite(11, HIGH);
digitalWrite(10, HIGH);
digitalWrite(9, HIGH);
digitalWrite(8, HIGH);
digitalWrite(7, HIGH);
delay(sensorValue);
digitalWrite(13, LOW);
digitalWrite(12, LOW);
digitalWrite(11, LOW);
digitalWrite(10, LOW);
digitalWrite(9, LOW);
digitalWrite(8, LOW);
digitalWrite(7, LOW);
delay(sensorValue);
// stop the program for <sensorValue> milliseconds:
// delay(sensorValue);
// turn the ledPin off:
// digitalWrite(ledPin, LOW);
// stop the program for for <sensorValue> milliseconds:
// delay(sensorValue);
}
心得:
當時在試驗旋鈕調LED燈的閃爍速度時,一開始都旋轉快,一下子就扭到底發現他就會故障,試了幾次都會這樣,當時還一直搞不懂! 後來詢問同學才知道,原來旋鈕轉到極限,會使整個線路"爆掉",所以在旋轉時只要旋轉小小的角度就可以達到我們影片中,路出來的效果囉!!
2012年11月20日 星期二
2012年11月12日 星期一
Midtern
1.圖片說明


 2.程式碼
2.程式碼
PImage img1, img2, img3,img4,img5; //宣告畫面
int now=1;
int a01=0,a02=0,a03=0,a04=0,a05=0,z01=0,e01=0,b01=0,b02=0,b03=0,b04=0,b05=0;
int x,y,z,c;
import ddf.minim.*; //音樂
AudioPlayer player;
Minim minim;
void setup(){
minim=new Minim(this);
player=minim.loadFile("159.mp3", 2048);
player.play();
size(700,500); //畫面大小
img1=loadImage("img1.jpg");
img2=loadImage("img2.jpg");
img3=loadImage("img3.jpg");
img4=loadImage("img4.jpg");
img5=loadImage("img5.jpg");
}
void show1()
{image(img1,0,0);}
void show2()
{image(img2,0,0);}
void show3()
{image(img3,0,0);}
void show4()
{image(img4,0,0);}
void show5()
{image(img5,0,0);}
void draw(){
if(now==1){
show1();
if(mouseX>53 && mouseX<353 && mouseY>163 && mouseY<259 && mousePressed){
now=2;
}}
if(now==2){
background(0);
show2();
if(mouseX>475 && mouseX<495 && mouseY>75 && mouseY<97 && mousePressed)
{a01=1;}
if(mouseX>488 && mouseX<512 && mouseY>131 && mouseY<150 && mousePressed)
{a02=1;}
if(mouseX>590 && mouseX<635 && mouseY>178 && mouseY<202 && mousePressed)
{a03=1;}
if(mouseX>400 && mouseX<427 && mouseY>200 && mouseY<255 && mousePressed)
{a04=1; }
if(mouseX>533 && mouseX<554 && mouseY>290 && mouseY<305 && mousePressed)
{a05=1;}
if(a01==1)
{line(475,75,495,75);
line(475,75,475,97);
line(475,97,495,97);
line(495,97,495,75);
strokeWeight(4);
stroke(0,0,0);}
if(a02==1)
{line(488,131,512,131);
line(488,131,488,150);
line(488,150,512,150);
line(512,150,512,131);
strokeWeight(4);
stroke(0,0,0);}
if(a03==1)
{line(590,178,635,178);
line(590,178,590,202);
line(590,202,635,202);
line(635,202,635,178);
strokeWeight(4);
stroke(0,0,0);}
if(a04==1)
{line(400,200,427,200);
line(400,200,400,255);
line(400,255,427,255);
line(427,255,427,200);
strokeWeight(4);
stroke(0,0,0);}
if(a05==1)
{line(533,290,554,290);
line(533,290,533,305);
line(533,305,554,305);
line(554,305,554,290);
strokeWeight(4);
stroke(0,0,0);}
if(a01==1 && a02==1 && a03==1 && a04==1 && a05==1 )
{now=3; }
}
if(now==3){
show3();
if(mouseX>519 && mouseX<673 && mouseY>123 && mouseY<188 && mousePressed)
{z01=1;}
if(z01==1)
{now=4;}
}
if(now==4){
show4();
if(mouseX>434 && mouseX<464 && mouseY>103 && mouseY<128 && mousePressed)
{b01=1;}
if(mouseX>391 && mouseX<432 && mouseY>184 && mouseY<223 && mousePressed)
{b02=1;}
if(mouseX>380 && mouseX<400 && mouseY>355 && mouseY<384 && mousePressed)
{b03=1;}
if(mouseX>355 && mouseX<379 && mouseY>405 && mouseY<432 && mousePressed)
{b04=1;}
if(mouseX>441 && mouseX<457 && mouseY>480 && mouseY<498 && mousePressed)
{b05=1;}
if(b01==1)
{line(434,103,464,103);
line(434,103,434,128);
line(434,128,464,128);
line(464,128,464,103);
strokeWeight(4);
stroke(255,0,0);}
if(b02==1)
{line(391,184,432,184);
line(391,184,391,223);
line(391,223,432,223);
line(432,223,432,184);
strokeWeight(4);
stroke(255,0,0);}
if(b03==1)
{line(380,355,400,355);
line(380,355,380,384);
line(380,384,400,384);
line(400,384,400,355);
strokeWeight(4);
stroke(255,0,0);}
if(b04==1)
{line(355,405,379,405);
line(355,405,355,432);
line(355,432,379,432);
line(379,432,379,405);
strokeWeight(4);
stroke(255,0,0);}
if(b05==1)
{line(441,480,457,480);
line(441,480,441,498);
line(441,498,457,498);
line(457,498,457,480);
strokeWeight(4);
stroke(255,0,0);}
if(b01==1 && b02==1 && b03==1 && b04==1 && b05==1)
{now=5; }
}
if(now==5){
show5();
if(mouseX>36 && mouseX<149 && mouseY>94 && mouseY<152 && mousePressed)
{e01=1;}
if(e01==1)
{exit();}
}}
4.影片
5.心得感想
這次期中作業,可以把以前到現在老師所教的程式做結合
不是單單的一個大作業,因為除了老師在課堂上教的以外
還需自己找程式,或是組上討論,問同學
這個作業會讓我一直想繼續做下去,想改到最好
跟以前的情況不一樣
很喜歡老師教的風格、方法
這個作業可以因增加難度、程式一直延續下去
關卡、介面風格等等都可以更精進
(1)開始畫面 按PLAY按紐

(2)第一關

(3)共有五個相異點 點出即會框出來

(4)找出五個就過關 按NEXT

(5)共有五個相異點 點出即會框出來

(6)過關 即結束

PImage img1, img2, img3,img4,img5; //宣告畫面
int now=1;
int a01=0,a02=0,a03=0,a04=0,a05=0,z01=0,e01=0,b01=0,b02=0,b03=0,b04=0,b05=0;
int x,y,z,c;
import ddf.minim.*; //音樂
AudioPlayer player;
Minim minim;
void setup(){
minim=new Minim(this);
player=minim.loadFile("159.mp3", 2048);
player.play();
size(700,500); //畫面大小
img1=loadImage("img1.jpg");
img2=loadImage("img2.jpg");
img3=loadImage("img3.jpg");
img4=loadImage("img4.jpg");
img5=loadImage("img5.jpg");
}
void show1()
{image(img1,0,0);}
void show2()
{image(img2,0,0);}
void show3()
{image(img3,0,0);}
void show4()
{image(img4,0,0);}
void show5()
{image(img5,0,0);}
void draw(){
if(now==1){
show1();
if(mouseX>53 && mouseX<353 && mouseY>163 && mouseY<259 && mousePressed){
now=2;
}}
if(now==2){
background(0);
show2();
if(mouseX>475 && mouseX<495 && mouseY>75 && mouseY<97 && mousePressed)
{a01=1;}
if(mouseX>488 && mouseX<512 && mouseY>131 && mouseY<150 && mousePressed)
{a02=1;}
if(mouseX>590 && mouseX<635 && mouseY>178 && mouseY<202 && mousePressed)
{a03=1;}
if(mouseX>400 && mouseX<427 && mouseY>200 && mouseY<255 && mousePressed)
{a04=1; }
if(mouseX>533 && mouseX<554 && mouseY>290 && mouseY<305 && mousePressed)
{a05=1;}
if(a01==1)
{line(475,75,495,75);
line(475,75,475,97);
line(475,97,495,97);
line(495,97,495,75);
strokeWeight(4);
stroke(0,0,0);}
if(a02==1)
{line(488,131,512,131);
line(488,131,488,150);
line(488,150,512,150);
line(512,150,512,131);
strokeWeight(4);
stroke(0,0,0);}
if(a03==1)
{line(590,178,635,178);
line(590,178,590,202);
line(590,202,635,202);
line(635,202,635,178);
strokeWeight(4);
stroke(0,0,0);}
if(a04==1)
{line(400,200,427,200);
line(400,200,400,255);
line(400,255,427,255);
line(427,255,427,200);
strokeWeight(4);
stroke(0,0,0);}
if(a05==1)
{line(533,290,554,290);
line(533,290,533,305);
line(533,305,554,305);
line(554,305,554,290);
strokeWeight(4);
stroke(0,0,0);}
if(a01==1 && a02==1 && a03==1 && a04==1 && a05==1 )
{now=3; }
}
if(now==3){
show3();
if(mouseX>519 && mouseX<673 && mouseY>123 && mouseY<188 && mousePressed)
{z01=1;}
if(z01==1)
{now=4;}
}
if(now==4){
show4();
if(mouseX>434 && mouseX<464 && mouseY>103 && mouseY<128 && mousePressed)
{b01=1;}
if(mouseX>391 && mouseX<432 && mouseY>184 && mouseY<223 && mousePressed)
{b02=1;}
if(mouseX>380 && mouseX<400 && mouseY>355 && mouseY<384 && mousePressed)
{b03=1;}
if(mouseX>355 && mouseX<379 && mouseY>405 && mouseY<432 && mousePressed)
{b04=1;}
if(mouseX>441 && mouseX<457 && mouseY>480 && mouseY<498 && mousePressed)
{b05=1;}
if(b01==1)
{line(434,103,464,103);
line(434,103,434,128);
line(434,128,464,128);
line(464,128,464,103);
strokeWeight(4);
stroke(255,0,0);}
if(b02==1)
{line(391,184,432,184);
line(391,184,391,223);
line(391,223,432,223);
line(432,223,432,184);
strokeWeight(4);
stroke(255,0,0);}
if(b03==1)
{line(380,355,400,355);
line(380,355,380,384);
line(380,384,400,384);
line(400,384,400,355);
strokeWeight(4);
stroke(255,0,0);}
if(b04==1)
{line(355,405,379,405);
line(355,405,355,432);
line(355,432,379,432);
line(379,432,379,405);
strokeWeight(4);
stroke(255,0,0);}
if(b05==1)
{line(441,480,457,480);
line(441,480,441,498);
line(441,498,457,498);
line(457,498,457,480);
strokeWeight(4);
stroke(255,0,0);}
if(b01==1 && b02==1 && b03==1 && b04==1 && b05==1)
{now=5; }
}
if(now==5){
show5();
if(mouseX>36 && mouseX<149 && mouseY>94 && mouseY<152 && mousePressed)
{e01=1;}
if(e01==1)
{exit();}
}}
4.影片
5.心得感想
這次期中作業,可以把以前到現在老師所教的程式做結合
不是單單的一個大作業,因為除了老師在課堂上教的以外
還需自己找程式,或是組上討論,問同學
這個作業會讓我一直想繼續做下去,想改到最好
跟以前的情況不一樣
很喜歡老師教的風格、方法
這個作業可以因增加難度、程式一直延續下去
關卡、介面風格等等都可以更精進
Week08,HW08
1.
你之前完成了什麼把所有的素材都找齊
並計算出大小(位置)
2. 你今天計畫完成什麼
查出所有相對應的程式
但發現有很多程式太複雜
---------------------------
找出第二個遊戲(海綿寶寶-大家來找碴)的原件
以及相對應的程式
3.可能會遇到的問題
所以小組討論完後決定找另一個遊戲
此遊戲為大家來找碴
並設定主題是海綿寶寶
並計算出大小(位置)
2. 你今天計畫完成什麼
查出所有相對應的程式
但發現有很多程式太複雜
---------------------------
找出第二個遊戲(海綿寶寶-大家來找碴)的原件
以及相對應的程式
3.可能會遇到的問題
所以小組討論完後決定找另一個遊戲
此遊戲為大家來找碴
並設定主題是海綿寶寶
2012年10月23日 星期二

2012年10月16日 星期二
week06,HW06
1.作品建議
(1)黃培恩----
踩地雷小遊戲--很有趣,從以前就很歡這個小遊戲,希望能再加入新的功能,會更吸引人
(2)蕭俊宇----
下樓梯小遊戲--眾所皆知的遊戲,一定會有死忠粉絲,希望能變畫更多(雙人對戰、闖關),更有賣點喔
2.我們的期中作業進度與流程
(1) 素材:人、衣服、褲子、配件
(2)遊戲說明:為幫人物搭配服裝
(3)遊戲方法:點選配件 直接回應完成服裝的效果
(4)code:要克服有透明化的程式
3.心得
開始做期中作業了,希望能把這幾周老師所教的程式都應用進去
加油!
(1)黃培恩----
踩地雷小遊戲--很有趣,從以前就很歡這個小遊戲,希望能再加入新的功能,會更吸引人
(2)蕭俊宇----
下樓梯小遊戲--眾所皆知的遊戲,一定會有死忠粉絲,希望能變畫更多(雙人對戰、闖關),更有賣點喔
2.我們的期中作業進度與流程
(1) 素材:人、衣服、褲子、配件
(2)遊戲說明:為幫人物搭配服裝
(3)遊戲方法:點選配件 直接回應完成服裝的效果
(4)code:要克服有透明化的程式
3.心得
開始做期中作業了,希望能把這幾周老師所教的程式都應用進去
加油!
2012年10月9日 星期二
week05,HW05
1.
(1)processing
void setup(){
size(600,600);
}
float rrr=0.008;
void draw(){
noStroke();
background(0,120,120);
fill(255,125,128);
rect(250,300,100,250);
ellipse(300,300,400,400);
ellipse(300,550,300,50);
fill(0,120,120);
ellipse(300,300,300,300);
translate(300,300);
rotate(rrr+=0.008);
fill(255,255,255);
for(int i=0;i<18;i++){
rotate( PI/3);
ellipse(100,20,200,100);
}
}
(2)pic

2.
(1)processing
void setup(){
size(600,600);
}
float rrr=0.008;
void draw(){
noStroke();
background(0,120,120);
fill(255,125,128);
rect(250,300,100,250);
ellipse(300,300,400,400);
ellipse(300,550,300,50);
fill(0,120,120);
ellipse(300,300,300,300);
translate(mouseX,mouseY);
rotate(rrr+=0.008);
fill(255,255,255);
for(int i=0;i<18;i++){
rotate( PI/3);
ellipse(100,20,200,100);
}
}
(2)pic

3.換衣服(髮型)的小遊戲

(1)processing
void setup(){
size(600,600);
}
float rrr=0.008;
void draw(){
noStroke();
background(0,120,120);
fill(255,125,128);
rect(250,300,100,250);
ellipse(300,300,400,400);
ellipse(300,550,300,50);
fill(0,120,120);
ellipse(300,300,300,300);
translate(300,300);
rotate(rrr+=0.008);
fill(255,255,255);
for(int i=0;i<18;i++){
rotate( PI/3);
ellipse(100,20,200,100);
}
}
(2)pic

2.
(1)processing
void setup(){
size(600,600);
}
void draw(){
noStroke();
background(0,120,120);
fill(255,125,128);
rect(250,300,100,250);
ellipse(300,300,400,400);
ellipse(300,550,300,50);
fill(0,120,120);
ellipse(300,300,300,300);
translate(mouseX,mouseY);
rotate(rrr+=0.008);
fill(255,255,255);
for(int i=0;i<18;i++){
rotate( PI/3);
ellipse(100,20,200,100);
}
}
(2)pic

3.換衣服(髮型)的小遊戲
2012年10月2日 星期二
week04,HW04
1
(1)processing
void setup(){
size(500,400);
background(255,255,255);
fill(255,125,128);
rect(0,0,50,25);
fill(255,125,0);
rect(75,0,50,25);
fill(255,255,128);
rect(150,0,50,25);
fill(100,150,10);
rect(225,0,50,25);
fill(125,200,255);
rect(300,0,50,25);
fill(0,0,0);
rect(375,0,50,25);
fill(255,255,255);
rect(450,0,50,25);
line(450,0,500,25);
line(450,25,500,0);
rect(0,50,50,50);
rect(0,100,25,25);
}
int www=5;
void draw(){
if(mousePressed && mouseX<50 && mouseY<25) stroke(255,125,128);
else if(mousePressed && mouseX<125 && mouseY<25) stroke(255,125,0);
else if(mousePressed && mouseX<200 && mouseY<25) stroke(255,255,128);
else if(mousePressed && mouseX<275 && mouseY<25) stroke(100,150,10);
else if(mousePressed && mouseX<350 && mouseY<25) stroke(125,200,255);
else if(mousePressed && mouseX<425 && mouseY<25) stroke(0,0,0);
else if(mousePressed && mouseX<500 && mouseY<25) stroke(255,255,255);
else if(mousePressed && mouseX<50 && mouseY>50){strokeWeight(++www);}
else if(mousePressed && mouseX<25 && mouseY>100){strokeWeight(--www);
if(www<2)www=2;}
else if(mousePressed) line(mouseX, mouseY, pmouseX, pmouseY);
}
(2)pic

2.心得
一次比一次更期待上老師的課了^^
(1)processing
void setup(){
size(500,400);
background(255,255,255);
fill(255,125,128);
rect(0,0,50,25);
fill(255,125,0);
rect(75,0,50,25);
fill(255,255,128);
rect(150,0,50,25);
fill(100,150,10);
rect(225,0,50,25);
fill(125,200,255);
rect(300,0,50,25);
fill(0,0,0);
rect(375,0,50,25);
fill(255,255,255);
rect(450,0,50,25);
line(450,0,500,25);
line(450,25,500,0);
rect(0,50,50,50);
rect(0,100,25,25);
}
int www=5;
void draw(){
if(mousePressed && mouseX<50 && mouseY<25) stroke(255,125,128);
else if(mousePressed && mouseX<125 && mouseY<25) stroke(255,125,0);
else if(mousePressed && mouseX<200 && mouseY<25) stroke(255,255,128);
else if(mousePressed && mouseX<275 && mouseY<25) stroke(100,150,10);
else if(mousePressed && mouseX<350 && mouseY<25) stroke(125,200,255);
else if(mousePressed && mouseX<425 && mouseY<25) stroke(0,0,0);
else if(mousePressed && mouseX<500 && mouseY<25) stroke(255,255,255);
else if(mousePressed && mouseX<50 && mouseY>50){strokeWeight(++www);}
else if(mousePressed && mouseX<25 && mouseY>100){strokeWeight(--www);
if(www<2)www=2;}
else if(mousePressed) line(mouseX, mouseY, pmouseX, pmouseY);
}
(2)pic

2.心得
一次比一次更期待上老師的課了^^
2012年9月25日 星期二
week03,HW03
1
(1)
void setup(){
size(600,600);
}
void draw(){
fill(255,125,128);
rect(150,300,300,100);
fill(150,255,100);
ellipse(mouseX,mouseY,250,1);
}
(2)

2.
(1)
void setup(){ //固定大小
size(600,600);
}
float x=50,y=50;
void draw(){
noStroke();
background(0,120,120);
fill(255,255,128);
ellipse(x-30,y,130,20);
ellipse(x+30,y,130,20);
fill(0,64,128);
ellipse(x,y,80,80);
fill(255,255,128);
ellipse(x-30,y,130,20);
fill(0,0,0);
translate(x,y);
scale(0.8,0.8);
mygr();
x=(x+mouseX)/2;
y=(y+mouseY)/2;
}
void mygr()
{
fill(100,150,10);
ellipse(x,y,150,150);
fill(100,150,10);
ellipse(x,y-60,10,80);
fill(100,150,10);
ellipse(x,y-100,20,20);
fill(100,150,10);
ellipse(x-80,y,20,80);
fill(100,150,10);
ellipse(x+80,y,20,80);
fill(0,0,0);
ellipse(x,y+40,20,20);
fill(0,0,0);
ellipse(x,y+40,60,8);
fill(255,255,255);
ellipse(x,y,50,50);
fill(255,255,255);
ellipse(x+40,y,50,50);
fill(255,255,255);
ellipse(x-40,y,50,50);
fill(0,255,255);
ellipse(x,y,30,30);
fill(0,255,255);
ellipse(x+49,y,30,30);
fill(0,255,255);
ellipse(x-49,y,30,30);
}

(1)
void setup(){
size(600,600);
}
void draw(){
fill(255,125,128);
rect(150,300,300,100);
fill(150,255,100);
ellipse(mouseX,mouseY,250,1);
}
(2)

2.
(1)
void setup(){ //固定大小
size(600,600);
}
float x=50,y=50;
void draw(){
noStroke();
background(0,120,120);
fill(255,255,128);
ellipse(x-30,y,130,20);
ellipse(x+30,y,130,20);
fill(0,64,128);
ellipse(x,y,80,80);
fill(255,255,128);
ellipse(x-30,y,130,20);
fill(0,0,0);
translate(x,y);
scale(0.8,0.8);
mygr();
x=(x+mouseX)/2;
y=(y+mouseY)/2;
}
void mygr()
{
fill(100,150,10);
ellipse(x,y,150,150);
fill(100,150,10);
ellipse(x,y-60,10,80);
fill(100,150,10);
ellipse(x,y-100,20,20);
fill(100,150,10);
ellipse(x-80,y,20,80);
fill(100,150,10);
ellipse(x+80,y,20,80);
fill(0,0,0);
ellipse(x,y+40,20,20);
fill(0,0,0);
ellipse(x,y+40,60,8);
fill(255,255,255);
ellipse(x,y,50,50);
fill(255,255,255);
ellipse(x+40,y,50,50);
fill(255,255,255);
ellipse(x-40,y,50,50);
fill(0,255,255);
ellipse(x,y,30,30);
fill(0,255,255);
ellipse(x+49,y,30,30);
fill(0,255,255);
ellipse(x-49,y,30,30);
}
(2)

3.心得
今天上的課非常實用 很期待下次新的程式碼^^
2012年9月18日 星期二
week02,HW02
1.
(1)processing
size(600,600);
for (int i=0;i<50;i++){
fill(random(255),random(255),random(255));
rect(random(250),random(250),random(150),random(150));
}
(2)pic

2.
(1)processing
size(700,500);
for (int i=0;i<70;i++){
for(int j=0;j<50;j++){
fill(i*155/50,j*300/20,100);
rect(i*20,j*50,20,20);
}
}
(2).pic


4.心得
原來顏色與形狀的不同
可以產生這麼多的變化
(1)processing
size(700,500);
for (int i=0;i<70;i++){
for(int j=0;j<50;j++){
fill(i*155/50,j*300/20,100);
rect(i*20,j*50,20,20);
}
}
(2).pic

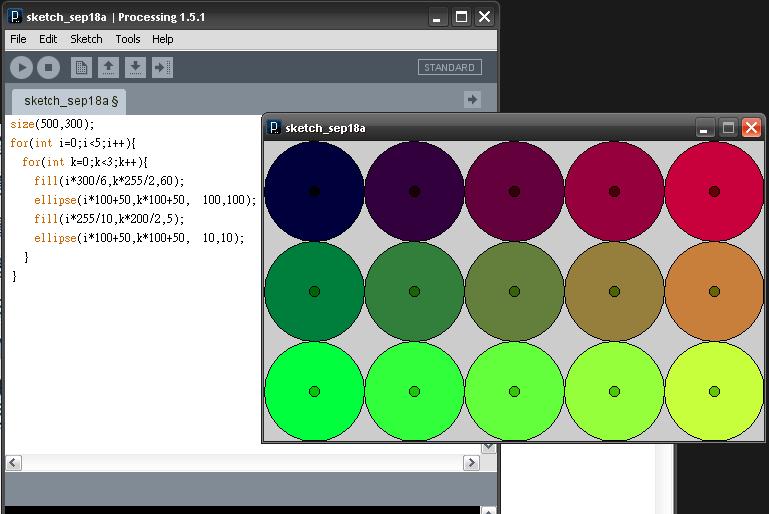
3.
(1)processing
size(500,300);
for(int i=0;i<5;i++){
for(int k=0;k<3;k++){
fill(i*300/6,k*255/2,60);
ellipse(i*100+50,k*100+50, 100,100);
fill(i*255/10,k*200/2,5);
ellipse(i*100+50,k*100+50, 10,10);
}
}
(2).pic
4.心得
原來顏色與形狀的不同
可以產生這麼多的變化
2012年9月11日 星期二
3D LED RGB Cube Laying Screen Display H48 Dance
1.processing影片
3D LED RGB Cube Laying Screen Display H48 Dance


3D LED RGB Cube Laying Screen Display H48 Dance
2.程式碼
size(500,500);
PImage rody;
rody = loadImage("
http://profile.ak.fbcdn.net/hprofile-ak-ash3/162020_108764849163248_4953921_n.jpg
");
image(rody, 20,20);

3.作業
(1)小畫家圖

(2)processing

(3)程式碼
void setup(){
size(340, 390);
background(255);
smooth();
}

void draw(){
beginShape();
line(35,193,168,16);
line(310,179,168,16);
line(35,193,51,222);
line(310,179,297,211);

line(169,59,297,211);
line(169,59,51,222);

line(77,193,90,313);
line(254,313,90,313);
line(254,313,272,192);

line(117,87,117,22);
line(82,30,117,22);
line(82,30,92,123);

line(110,155,234,155);
line(110,155,118,260);
line(224,260,234,155);
line(224,260,118,260);

line(119,162,166,161);
line(167,249,166,161);
line(167,249,123,253);
line(119,162,123,253);

line(177,161,224,162);
line(220,250,224,162);
line(220,250,174,250);
line(177,161,174,250);

line(103,260,175,300);
line(246,260,175,300);

endShape();
}
4.心得


第一次上互動技術的課,很有趣
收穫很多
程式碼原來可以這麼不複雜
訂閱:
文章 (Atom)